Thursday, 6 February 2014

How the Concept of Craft Test Dummies was Created

Probably you have no idea what Craft Test Dummies have to do with presentation of beauty and review of products. This is according to Jenny Barnett Rohrs who carries out simple product reviews and tutorials on a remarkable website. Markers will be used on different papers, inks across different mediums and unusual ways will be used to make cards and other crafts.

Craft Test Dummies website was born after Jenny realized that she could not find answers online regarding which markers were suitable to include on her fabric quilts and how long the adhesive she used would take to dry. Since 2008 the website has been growing steadily and attracting like-minded people who want to be online craft – mentors. The website so far has four other “Testers”, all volunteers.

The success for Craft Dummies website is based on these two key principles:
  • “we are provided product to review, but the review will be honest first, and helpful second”
  • “Our audience can smell a fake and we will turn stuff down if it’s not right for the blog”.
Jenny and her testers will also provide manufacturers with feedback about their products. She enjoys a range of craft and will “play with anything”. “Paint, mist, stencil, draw, Zentangles – whatever is at hand”.

She is a working mother and will juggle her family and business. Besides, she has a supportive partner. Jenny has her passion for all things crafting shines through and her parting shot is that “You need to believe in what you are doing”.

Saturday, 1 February 2014

Making your Own Ribbon Wrapped Journal

Mixed Media Art will always be at hand to help you out with your creativity. We all love to give gifts and MMA have packed a secret for you of a personalized gift; that of a ribbon wrapped Journal. You will need items like Needle and thread, Ribbon and journal of choice, cutters and markers, Metal D ring, adhesives, Velcro strips and embellishments.

The process of making the journal is as follows:
  • Wrap the ribbon 1.5 times around your journal but ensure the D – ring is at the front and Velcro closure at the back. Then sew a seam on both ends of the ribbon.
  • Sew the D ring on to one end of the ribbon then, wrap the ribbon around the journal and thread the ribbon through the ring to determine the placement of the Velcro strip. The ribbon should not be twisted and the D – ring should be straight. 
  • Mark the placement for the Velcro strips with a fabric pen or marker. While the ribbon is still wrapped around the journal go ahead and mark the place for your embellishments. 
  • Now Remove ribbon and attach the Velcro strip according to package instructions. Using your imaginations and creativity, add your embellishments.
  • Once the embellishments are attached to the ribbon, wrap it around the journal again while gluing it to the spine of the journal.
You have finished your journal project!

Tuesday, 21 January 2014

Gelli Plate Prints for Colorful Backgrounds

Beauty is always good to the eyes and so is the ability that enables you to put your creativity to the best use. However Mixed Media Art have their way of showing you how to do so using colorful prints or jelly plate prints as follows:

  • Handmade greeting cards - You can show off your colorful prints by tearing the jelly prints to size, add a little ink round the edges then use double sided tape to stick it to the card while stamping a greeting.
  • Teabag folding - Identical prints are preferred for this and more so the Gelli plate prints. Of course you will have to fold them into the right shape so as to have the correct flower arrangement.
  • Personalized Envelopes and stationery - Prints that are just lying around can be put into better use by making envelopes. This is besides the Christmas gift wrappers.
  • Art Journaling - You can create pre – printed backgrounds of an art journal using excess paint from the stencils and brayer. The color – coordinated prints will in addition add beautiful features.
The above techniques are so inspiring and if you don’t have a collection of these prints, you can still use bought background papers or backgrounds you have made using other mixed media techniques like found object painting.

Tuesday, 14 January 2014

Using Duct Tapes in making Colorful Flowers

Have you ever thought about the beauty of duct tape flowers what you can make out of them? According to Angee Woodman’s exploration, adding a flower onto the end of a pen or pencil, a skewer or wire would give you great designs. Here are the simple tools that will enable you to achieve the same:

  • Scissors
  • Skewer, wire or pen for supporting the flower
  • Two colors of duct tape regardless of the design

With the above tools you will follow the steps/process below to make your duct tape flowers: 

Step 1:

You begin by covering the base of your skewer, wire or pen while wrapping the same the same with the duct tape.

Step 2:

Make the petals by measuring two inches of duct tape of whatever print of color you want to use. 20 pieces will do for a small flower but you can still add if your feel the flower is not yet full.

Step 3:

Bend one corner so as they look like a boat sail and fold the other edge over. Wrap this around the very end of the pen opposite of the end you write with. The print should be on the outside and the sticky part of your petal should be wrapped around the pen base.

Step 4:

Repeat the process with an objective of putting petals in between other petals as the flower takes shape.

Step 5:

Now add leaves so as to blend with the stem and there you have it.

Tuesday, 7 January 2014

Artistic Mixed Media Ornaments for Christmas

It is during a festive season that many people tend to show case their creativity especially in art. Mixed Media has not been left behind. In an effort to share their passion Mixed Media Art has been able to put to good use its techniques by making Media Christmas Ornaments using the Mixed Media supplies. Let’s see what they made:

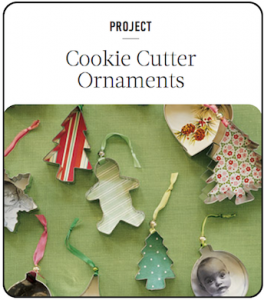
  • Cookie Cutter Ornaments - While your creativity in making this will dictate you – whether to be simple or lavish, you will be able to display those lovely ephemera sheets and lovely background. However the glueing part will need a lot of care. 
  • Paper Origami Flower Ornaments - According to Jenn of Origami Twist this involves glueing and folding gorgeous flower ornaments. 

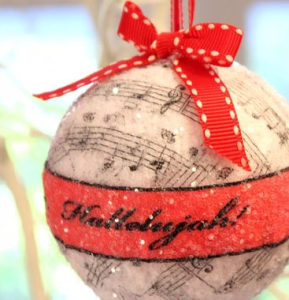
  • Paper Ephemera ornaments - This comes about as a result of lots of collections which include old book pages, paper ephemera, and painted backgrounds in addition to Gelli prints. You can also add some red ribbon and sparkly glitter to this Christmas ornament.

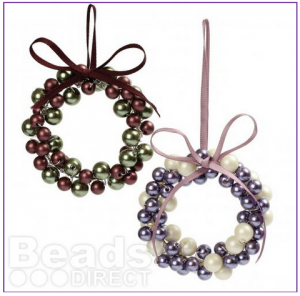
  • Beading Mini Wreath Ornament - Those that are passionate about jewellary, it is in making this ornament that you will be able to apply your jewellary making skills. You will then need a collection of beads, jewellary wire and some ribbons. To create an interesting wreath, you could mix buttons and beads.


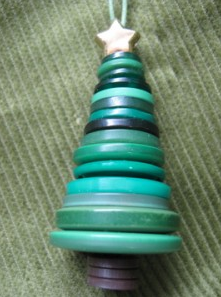
  • Button Tree Ornaments - This is a must try ornament for those of us that are button fetish. 


Tuesday, 12 November 2013

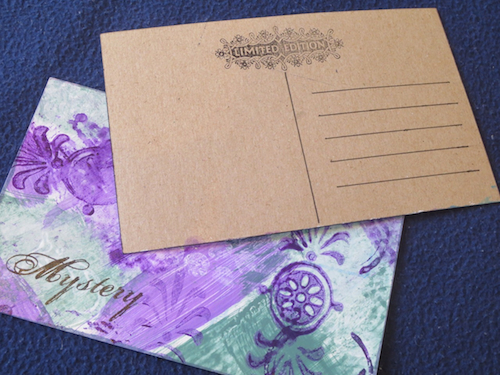
Want to Learn How to Make a Postcard? Register now for Mixed Media Postcard Art Tutorial

Probably you did not know how well you can celebrate a birthday or an anniversary without necessarily being too expensive. Mixed Media Art is one platform that will show you how well you can achieve this using available mixed media techniques that will help you put create and out together post cards that you can use to invite your friends and family to your big occasion. Your skill level at this point does not matter and neither is your preferred style. At the end of it all it is about the inspiration you get from your work.

It is for this reason that Mixed Media Art has established two sessions for online tutorial art that will help you come to terms with what suits you best. These will be online tutorials that will help you develop your Mixed Media Skills towards creating of a postcard. And why do you choose on a postcard? You can play around with simple techniques that will eventually create wonderful backgrounds that can be used during any holiday season. Good luck as you attend the sessions.

Come and visit our tutorial video - it's available right now!

Monday, 21 October 2013

Gelli Plates is what you Need from Gelli Arts for your Prints

Probably you have no idea how much more Mixed Media Art has to offer and the level of customization you can get to. The imagination that you want to use gelatine to make your own printing plate could make you sick because of the messy situation associated with gelatine plus the fact that you will spend so much time.

However GelliArts have created the Gelli Plate which is an alternative for you and much better because it is non - perishable. It will give you the same results as having used gelatine but it is non – toxic and you will be able to make many more prints. You will get the Gelli Plate in three different sizes 6″x6″, 8″x10″ and 12″ x 14″. It is said that the 8″x10″ is the best for A4 sheets of paper.

While it is advisable that you gather together all the materials you need as well as ensuring you have enough space, see below some of these materials that you will need:
  • Acrylic paints
  • The Gelli Plate
  • A brayer and mark making tools
  • Stencils
  • Netting or lace
  • Sequence wrap
Even as you make your prints you ought o exercise some creativity.